You need to sharpen your blender blades every once in a while to keep them chopping properly and working at their best.
Once the blades get old and blunt, a lot of people replace the blades or buy a new blender. But you can save a lot of money if you know how to sharpen the blades instead. It is very simple and easy.
Using the right methods and tools, you can easily sharpen your blender blades at home. Keep in mind that you need to take all the necessary precautions and wear protective gloves all the time to avoid injuries.
Follow on to know how to get your blender blades to crush ice again!
What You Will Need
Here are all the essential materials that you will need to sharpen your blades:
- Screwdriver
- Sanitary wipes
- Paper towels
- Protective gloves or kitchen mitts
- Towel
- Soap
- Water
- Sharpening stone or combined diamond sharpener
Step-By-Step Instructions
Disassemble The Blender
The first thing you need to do is to figure out if your blender is dismantlable or not. Some models do not allow you to dismantle them or separate the blades from the container, which will make it very difficult to sharpen them at home.
If your blender is not dismantlable, then you need to send it to a professional or you can contact the manufacturing company for support.
However, if you can dismantle your blender, then you need to start off by unplugging your device. Start taking each section apart carefully.
Be very cautious when touching the blades since they can cut your fingers easily and cause injury.
Wash The Jug
Any food residue sticking in the blender will make it very hard to sharpen the blades. They can make your hands slip and get injured easily and they can also form an obstacle and prevent the sharpening process.
So, you need to clean each section of the blender from any food residue or dirt before you start cleaning. Start with cleaning the jug and lid thoroughly. Then, clean each blade on its own very carefully.
Your main focus should be on the blades themselves. Make sure there is not any sticking food on the surface. This will help you sharpen them seamlessly and easily later on.
You can also clean the motor by wiping it down with a wet paper towel. You can also use some soap before you wipe it dry eventually. But your best and safest option would be using a sanitary wipe. Make sure you dry the motor very well before you assemble the device back and plug it in.
When you dry the blades, pat them dry cautiously with a dry cloth or a clean paper towel.
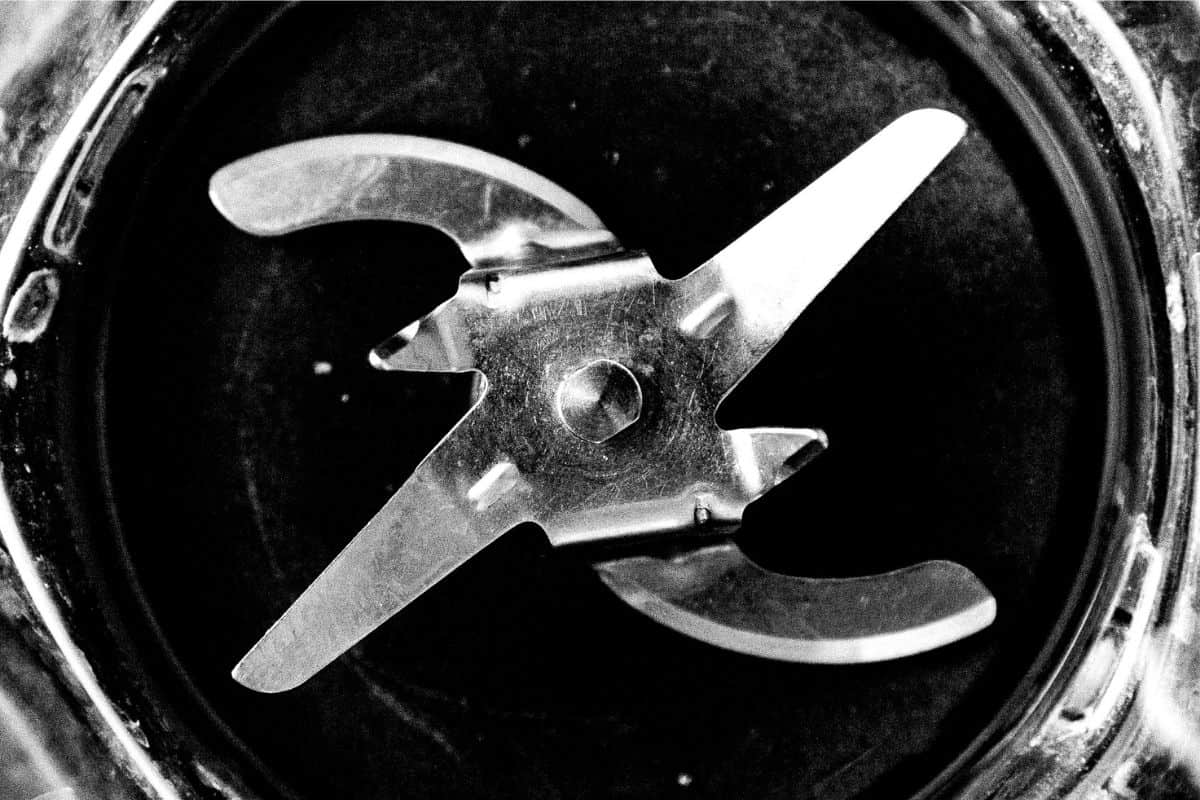
Remove The Blade
To take the blades of the blender, you will need to twist them counterclockwise until you separate them from the base. You should never touch the blades with your bare hands. It is very dangerous and you can cut your hands if you are not being careful.
To protect your hands, you need to wear protective gloves or even cooking mitts. They can be very helpful when it comes to gripping and cleaning sharp materials.
Once you have twisted the blades out and separated them from the blender, you should have the blades, a protective ring, and the base of the device. Place these three parts delicately on a towel and do not lose any of them.
Wash the Blade
Food residue can keep accumulating underneath the blades, especially after using it for a long period of time. That’s why you need to clean that part once again after you separate the blades from the blender.
You’ll need a minimal amount of soap while using this section. Be careful while handling them and rinse them with water thoroughly until they are adequately clean.
Once you are done cleaning, you can head to the main step which is sharpening the blades.
Sharpen the Blade
After letting your blades dry, you can now start with the most important step. You can either use a sharpening stone or a combined diamond sharpener.
Here is how to use both of them:
1. Sharpening Stone
Start by positioning the sharpest side of the blade to be away from your body and put it on a sharpening stone. Keep running the blade against the sharpening stone while positioning it at a slight angle.
Remember to keep pushing the blades from your body and not towards you in order to avoid any injuries by mistake.
After running the edge of the blade against the blade many times, flip it over and do the same thing to the other side of the blade. Keep running until the blade is sharp enough.
Although this is very dependent on which model and brand you are using, most blenders have around 4 sides to sharpen. Two are located in the front of the blades and the other two are located at the back.
You need to repeat the sharpening process on all the blades until you get a sharpened end on each side.
So, how do you know if the blades are sharpened enough or not?
You can easily determine if the blades are sharpened enough or not just by looking at them. When the blade is sharpened, it should have a slight glint to it and you can also see them sharper than before. If not sharpened properly, they will look dull and blunt.
However, never get tempted to touch the blades to see if they are sharp enough or not. Newly sharpened blades can slice through anything, even if you touched them very lightly.
So, the best way to test them is to use a piece of paper or better wait until you assemble the whole device back and test them on food.
2. Combined Diamond Sharpeners
There are different techniques depending on what type of blade you have.
The device has different stages and each stage has two slots. If the blades you are using are double-edged, then alternate them between the 2 slots. On the other hand, if you have a single-edged blade then use the first slot only.
Here are the 3 types of blades and how to use a combined diamond sharpener for each one of them:
1. Sharpening Very Slim Double-Edged and Single-Edged Blades
Double-edged blade: Put your double-edged blade in the slot of the first stage then run it smoothly and slowly. You don’t have to slide the blade hard to harden it. Alternate between the 2 slots of stage one twice. You do not need to alternate more than 2 times on each side of stage one.
Then, move the blade to the third stage. Start sliding the blade smoothly and slowly through the 2 slots and keep alternating between them around three to four times. These last alternating pulls are important to finish off the blade and give it a smooth and polished edge.
Single-edged blade: If you have a single-edged blade, then use the first slot of stage one only. And after you are done, move to the first slot of stage three to smooth off your blade.
2. Sharpening Thicker Double-Edged and Single-Edged Blades
Double-edged blade: Insert the double-edged blade in the slot of the second stage, then run it smoothly and slowly. Keep alternating between the two slots of stage two twice only. You do not need to alternate more than 2 times on each side of stage two.
Then, move the blade to the third stage. Run the blade smoothly and slowly without rushing. Alternate between the 2 slots for around three to four times only. Alternating for 3 – 4 times will give the edge a polished and smooth finish which is very important for successful sharpening.
Single-edged blade: In case you have a single-edged blade, then use the first slot of stage two only. And after you are done, move to the first slot of stage three for polishing and finishing the edge.
3. Sharpening Serrated Blades
Put the serrated blade in the slot of stage 3 and run it gently and slowly. In case your blade is double-edged, then keep alternating between the 2 slots of stage three.
Three to four alternating pulls are enough to sharpen your blade. You can judge if the blades are sharpened enough or not just by looking at them
Put Everything Back Together
Once you are done sharpening the blades, you need to assemble the whole blender back together. Start by placing the protective ring back in the blender’s base. Then, start screwing the blades carefully.
When you attach the glass container, you need to make sure that everything is locked and secured into place properly. You also need to make sure that the motor is dry before you plug the blender in.
Now it is time to test your own work!
Start by making a smoothie or something simple to see if the blades started to chop properly once again.
If they are still dull, maybe try to sharpen them once again.
Related Posts
Final Thoughts On How To Sharpen Your Blender Blades At Home
Sharpening your blender blades is an easy and simple task. However, you’ll face some risks, such as injuring your hands or damaging the blender while dismantling it. So, only do it if you are comfortable dealing with sharp blades.
Check out our guide to help you sharpen your blades the way professionals do!

Related Posts